Clamming combines outdoor adventure with a treasure hunting that culminates in delicious, fresh natural food from the sea. When you find the right spot and get a little practice with the technique, you can have a gratifying living-off-the-land experience and a surprisingly tasty meal for your efforts.
Where to Find Quahog Clams
Clam rakes are most often used to harvest quahog clams, also called hard clams. Quahogs live right below the sand or mud in tidal water. They live in sandy, muddy, and sometimes rocky bottom and tend to cluster along the shore line. They can be found in sand or mud flats exposed at low tide and in the shallow water nearby.
Hard shell clams will be just under the surface. Scraping your clam rake an inch or two into the bottom will be enough to feel the distinctive "clink" of your clam rake bumping a clam's shell.
Clamming is typically done in back bays or estuaries where the shorelines are protected from ocean waves. Once you find a location with clams, there will be more nearby. You will usually find clams in clusters with a few inches or a few short feet from each other.
Like the best fishing spots, clammers tend to treat the best clamming locations as top-secret information. You can often get local insider knowledge by asking at bait and tackle shops along the shore - especially shops that sell clamming supplies. A little reconnaissance can also reveal good clamming sites. Online aerial maps will show muddy or sandy flats exposed during low tide. Visit these locations and you will find some with clamming activity and some without. Not all tidal flats have clams, or have enough clams to warrant a trip.
It's worth noting that tidal pools, low areas on the exposed flats that hold water at low tide, can be especially productive areas for clams.
Once you find the right location, find an open section of ground at low tide or wade into the water and start scraping the bottom in search for clams.
Areas Closed to Clamming
States Departments of Natural Resources will often close or restrict specific areas from recreational clamming to protect public health or to protect clam populations. States constantly monitor water quality to determine if clams in certain areas are safe for consumption. Search your state's website or contact your state's DNR for maps of suspensions and restrictions before you head out for a day of clamming.
Clamming Etiquette
The one golden rule of clamming etiquette is not to intrude where others are clamming. It's okay to clam nearby and you will usually find several families clustered together in the same area. But, leave as much room between you and others as possible. The number of people in the same areas will dictate what that minimum distance is. Our experience is that clammers are a friendly, easy-going bunch but they can be a bit territorial. Depending on the crowds on a particular day, you might end up clamming next to someone else but it's not good etiquette to "play through" in an area when someone else is already clamming there.
Clam Sizes
Clams are graded by size and given unusual names. Instead of "small", "medium", and "large", the following names are given to the various sizes.
Little Neck - 1 in. hinge width, 10 - 13 clams per pound. The smallest and sweetest of the clams and the most desired commercially. Often served steamed with butter or whole over pasta.
Middle Neck - 1-1/4 in. hinge width, 7-9 clams per pound. Prepared and served in the same ways as little necks.
Top Neck - 1-1/2 in. hinge width, 5-7 clams per pound. The most common size for recipes that are served in the shell.
Cherry Stone - 2 in. hinge width, 3-4 clams per pound. At this size the meat is getting a little tougher. Often used where the recipe calls for chopped clams. Cutting the clams into smaller pieces makes slightly tough clams much more enjoyable,
Chowder - 2-1/2 inch hinge and larger. 1-2 clams per pound. Big, old, and tough. The most flavorful type of clam. Called chowder clams because they are suited for chopping small and adding to chowders. Also often as "clam strips" or clam fritters sliced, breaded, and fried.
What to Wear
Water Shoes - Many of the clams you find will be in ankle- or knee-deep water. Areas with quahog clams also have razor clams, broken glass, and oyster shells. Water shoes are a good way to protect your feet. Flip-flop shoes will help protect your feet in areas with solid sandy bottom. In areas with muddy bottoms, flip-flops will become lost in the mud.
Hip Waders or Chest Waders - In cooler weather a pair of waders will let you get into the same ankle- or knee-deep water.
Gloves - In cold weather, wet hands are a good way to become uncomfortable fast. insulated, rubber coated, "watermen" gloves make working outside in the water bearable.
Tools of the Trade
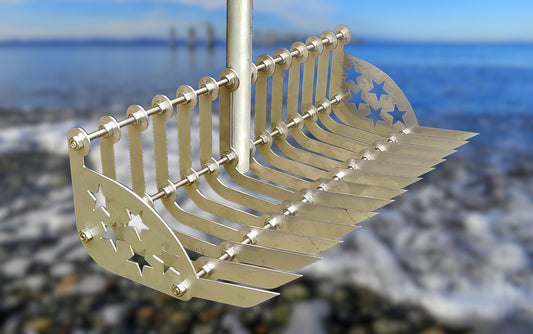
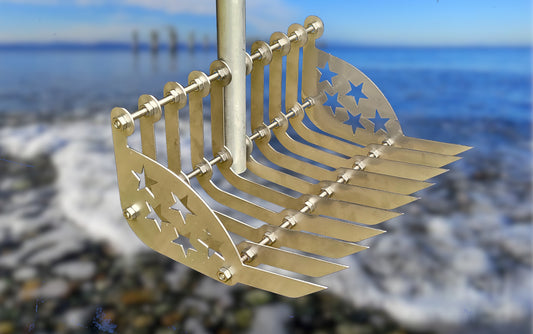
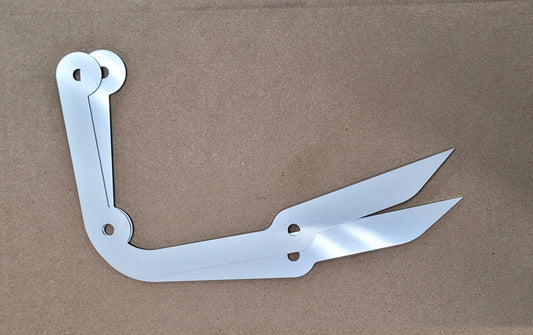
Clam Rake - That sharp tined tool used to scrape the sand or mud in search of clams. Actually, the rake does three different jobs. (1) When you hear the distinctive "clink" sound you know you've hit a clam. (2) The rake is then used to dig the clam out of the bottom and with a practiced flip to turn the rake head tines up, the clam will be in the basket of the rake. (3) Finally, shaking the rake under the water washes away the sand and mud leaving a clean clam for the basket.
Bucket or Basket - You need a place to put your freshly harvested clams. The most commonly used clam basket today is a plastic 5-gallon bucket with holes drilled in the bottom. If you are clamming in knee deep water, a pool noodle attached to the top of the basket with wire ties makes a great floating clam basket. Drill holes near the top of the bucket for the wire ties and use a piece of rope to tether the basket to your belt loop so it doesn't float away with your catch.
There are still a lot of vintage wire clam basket available on eBay, Craigslist, or at antique shops near the coasts. These baskets were the standard before plastic buckets and are still our favorite.
Clam Bag - A mesh bag is a great container to for your harvested clams. Fill your bag as you harvest and dump the bag into your clam basket as the bag gets full. A clam bag saves having to walk to your basket every time you harvest a clam.
Shellfish Gauge - Each State has different rules concerning minimum clam size that is legal to harvest. Clams under the legal limit must be returned to the location where they were harvested.
Shellfish gauges come in a wide variety of shapes. Some shellfish gauges include a round hole of a specific size. If the clam slides through the hole it is too small. If the clam does not fit through the hole, it is large enough to keep. Others have a notch cut into one side of the gauge that is used in the same way. If the clam fits in the notch, it's not a keeper. If it doesn't, it's good to keep.
Your local bait and tackle shop will have the correct type and size gauge for your local clamming regulations.
Shellfish License - In most locations a license is required to dig for clams. Check with your state's Department of Natural Resources for information on licensing, daily limits, clamming seasons, and areas closed to clamming.
How to Keep Clams Alive?
Stored properly, hard clams can live up to 5 days out of water. Most experts recommend eating clams within 2 days of harvesting clams.
When transporting clams home from a day of clamming, they can travel either in a cooler with ice or submerged in a container with water that came from the place they were harvested. When storing clams with ice, keep the clams separated from the ice with a towel or other barrier. The clams should be kept cool, not frozen. Placing clams directly in the ice will kill the clams.
If you choose to transport clams submerged in water, don't leave them in water once you get to your destination. Clams will drown from lack of oxygen if left submerged in a container for too long. Never store clams in fresh water. Fresh water will kill clams.
Once home, spread the clams out on a towel and place them in the refrigerator in an open container with a moist towel on top of the clams. When cooking the clams, check each one to make sure each clam is still alive. One dead clam opening up during cooking will ruin the whole pot.
How to Know if a Clam is Alive
Clams that stay open, even a little bit, when tapped or moved are dead. Live clams will close quickly at any sign of danger. Discard any clams that remain open.
Clams that won't stay tightly closed are also dead. The traditional method of testing is to tap the clam on the countertop or table. A live clam will keep its shell closed when bumped on the table. Any clam that opens when bumped is dead and must be discarded.
Live clams will smell like the ocean. Dead clams will smell fishy or of ammonia.
Purging Clams
Some clams are gritty with sand and some are not. If you clam in an area with sandy soil, you will likely want to purge your clams. If you calm in a muddy area, you may not need to purge your catch.
To purge clams, leave them submerged in an open container of water that came from their home waters for 1 hour. If sea water is not available, you can use 1/3 cup of salt dissolved in 1 gallon of water instead. Do not use fresh water. Fresh water will kill clams.
If the volume of the purge water is small, it could be necessary to change the water in the middle of the purging. After that time, remove the clams from the water and cook them immediately or store them in the refrigerator as described above.
One of the most common old wives tales about purging clams says to let them sit in a slurry of corn meal and water. According to the myth, the clams eat the corn meal and the corn meal pushes the sand through and out of the clams digestive tract.
The fact is: clams do not eat corn meal. Clams are filter feeders and live on phytoplankton, zooplankton, and minerals dissolved in sea water. The purging really happens when clams push the seawater in and out of their shells.